Understanding the Preferences Menu in Vitals
Last updated on September 4, 2026
The Preferences menu is where you manage the settings that apply to Vitals as a whole — rather than to one specific app. This is where you set your dashboard language, control how your storefront behaves after Add to Cart, review your plan, add store-wide custom code, and connect an AI assistant such as Claude or ChatGPT to your store data. This article walks through every function, section by section.
To open it, go to Vitals in your Shopify admin and click Preferences in the app's navigation menu.
Your workspace
Settings that affect how the Vitals dashboard works for you — they don't change anything your customers see.
Admin interface language
Choose the language of the Vitals dashboard from a searchable list of 130+ languages. This changes the language of the dashboard only — it does not translate what your customers see on your storefront. To translate customer-facing texts, use Localization instead.
Allow the customer support team to edit my settings
With this option enabled, the Vitals support team can adjust your app settings for you when you contact us — useful when you'd rather have us apply a fix or configuration directly. If you prefer that support can only view (not change) your setup, turn it off.
What shoppers see
Settings that control how Vitals looks and behaves for your customers, across all Vitals apps.
Color theme
Sets the default color scheme Vitals widgets use on your storefront, so text and backgrounds always have enough contrast to be readable:
- Light — backgrounds are generally white and text is dark. The right choice for most stores.
- Dark — backgrounds are generally dark and text is white. Choose this if your store uses a dark theme.
After Add to cart
Controls where customers go after clicking Add to cart on a Vitals element. This is the store-wide default, with four options:
| Option | What happens after Add to cart |
|---|---|
| Auto detect | Vitals detects your store's setup: if a cart drawer or cart notification can open (for example, the Vitals Cart Drawer or a supported theme drawer), the customer stays on the same page and sees it — otherwise they're taken to the cart page. |
| Cart page | The customer is taken to the cart page. |
| Checkout page | The customer is taken straight to checkout. |
| Stay on the same page | The customer stays where they are — ideal when your theme uses a cart drawer. Custom actions can also be triggered with a hook; contact our support team for details. |
💡 Individual apps and offers (for example, Upsell Builder offers) have their own Add to cart redirect setting with a Use global setting option — leave that enabled to follow this store default, or disable it to give a specific offer different behavior.
Script loading
Delays downloading the Vitals script until a visitor first interacts with the page — a scroll, tap or key press — or until the delay you set runs out. It can improve your PageSpeed score, but Vitals widgets, pop-ups and tracking all start later, so read the dedicated article on delaying the Vitals script loading before you turn it on. Not every store has this option yet.
Plan & maintenance
Plan details
Click View plan to review the features and limits included in your current Vitals plan, or to change plans.
Currency rounding rules
If your store uses Shopify Payments multi-currency and you've recently changed your price rounding rules in Shopify, click Sync now to bring the updated rounding rules into Vitals. This keeps discounted prices shown by Vitals consistent with the rounded prices Shopify displays. You'll see a Synced badge once the sync has started.
Custom code
This section lets you add your own CSS and JavaScript on top of Vitals — typically to fine-tune the look of a Vitals element or integrate custom behavior. When custom code is saved and the Vitals app embed is enabled, a Live on your store badge confirms the code is actually running on your storefront.
Custom CSS
Add CSS rules that load on your storefront — the usual place for visual tweaks to Vitals elements, like colors, sizes, spacing, or hiding a specific part of a widget. The editor validates your CSS as you type and won't let you save invalid code. Custom CSS can be up to 15,000 characters.
Custom JavaScript
Add JavaScript that runs on your storefront. Because custom code can break layouts, slow pages, or block checkout if it contains errors, the editor stays locked until you tick "I understand custom code risks and will test before going live." Always test your store right after saving, and remove the change if anything looks wrong.
The JavaScript is organized in three tabs, based on when the code runs:
| Tab | When it runs |
|---|---|
| First | Before the rest of your custom code — use it for setup other scripts rely on. |
| Last | After the page has loaded — use it for code that needs the final page. |
| Hooks | On Vitals events like add to cart and cart updates. |
Your code is validated before saving — JavaScript with syntax errors or deprecated jQuery patterns can't be saved until it's fixed.
AI assistants [NEW]
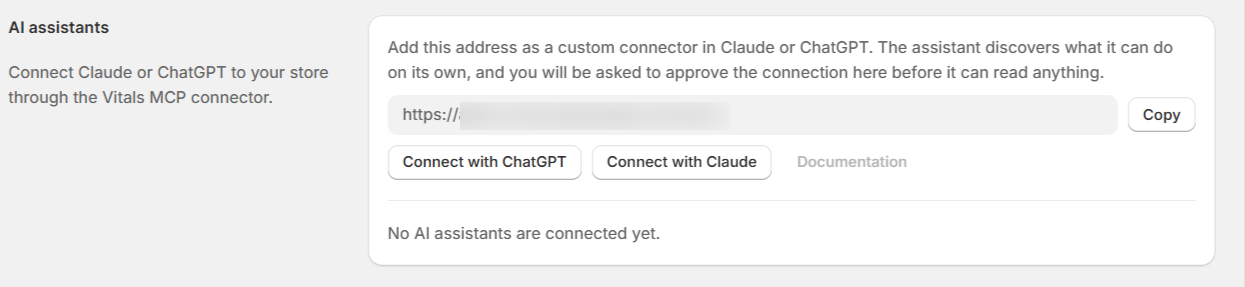
Connect Claude or ChatGPT to your store so you can ask about your Vitals data in plain language, like, "how are my reviews doing?", "which upsell offers earned the most last month?", and read the answer inside the assistant you already work in.
We have a standalone article for this feature that you can read here: [NEW] Connecting Claude or ChatGPT to Your Vitals Data
Connecting an assistant
This section shows your store's own connection address in a read-only field, with a Copy button beside it. You add that address in Claude or ChatGPT as a custom connector — there is no API key to generate, and nothing to paste back into Vitals.
- Step 1. Click Copy to take the connection address.
- Step 2. Click Connect with ChatGPT or Connect with Claude. Your assistant opens in a new tab with a message ready to send, asking it to walk you through adding the connector. Those steps sit inside the assistant's own settings and change often, so the assistant itself is the most reliable guide to them.
- Step 3. When the assistant asks to connect, you're brought back to Vitals to approve it. The approval screen names the assistant, lists everything it's asking to read, and confirms the connection is read-only.
- Step 4. Click Approve. Nothing is shared until you do, and Cancel stops the connection there.
If the approval screen sits unanswered for more than about ten minutes, the request expires. Just start again from your assistant.
What an assistant can read
The approval screen lists the areas the assistant is asking for, and you approve them as one set rather than picking them individually. Six areas are available:
- Visitor Replays — sessions, page statistics and journeys.
- Store overview — key metrics from every Vitals feature.
- Upsell Builder — offers, orders and revenue.
- Product Reviews — ratings, review content and summaries.
- Email Marketing — campaigns, opens, clicks and revenue.
- Wishlist — saved products and trends.
Every connection is read-only. An assistant can report on your Vitals data, but it can't publish a review, change an offer, or edit any setting.
Managing connected assistants
Each assistant you've approved is listed here with its name and when it was last used. Click Disconnect beside one to revoke its access straight away. You can always reconnect from this same section later. Before you connect anything, the list reads "No AI assistants are connected yet."
Tips
- Changed your theme from light to dark (or the other way around)? Update the Color theme here so all Vitals widgets stay readable, instead of restyling each app individually.
- If your theme has a cart drawer and adding a Vitals offer to cart sends customers to the cart page instead, set After Add to cart to Stay on the same page.
- Keep custom code as small as possible and test on your live store immediately after each save — it's much easier to trace a problem to the change you just made.
- An AI assistant connection is read-only, so there's little risk in trying one — an assistant can read your Vitals data and nothing else. Anything you want to act on still happens inside Vitals.
FAQ
Does changing the language here translate my storefront?
No. The language setting only changes the Vitals dashboard you work in. Customer-facing texts are translated in Localization, where you can edit the texts each Vitals app shows on your storefront.
Which apps does the "After Add to cart" setting affect?
It's the store-wide default for Vitals elements with an Add to cart action. Apps and offers that have their own Add to cart redirect setting follow this default while Use global setting is enabled, and only differ if you override it there.
Why can't I type in the Custom JavaScript editor?
The editor is disabled until you tick the acknowledgment checkbox in the warning banner — "I understand custom code risks and will test before going live."
Why won't my custom code save?
Saving is blocked while the code is invalid: CSS that doesn't parse (or exceeds the 15,000-character limit), JavaScript with syntax errors, or JavaScript using deprecated jQuery patterns. Fix the highlighted error and save again.
What does the "Live on your store" badge mean?
It appears when you have saved custom code and the Vitals app embed is enabled on your theme — in other words, your custom code is actually running on your storefront. If the badge is missing even though you saved code, check that the app embed is enabled.
Do I ever need to click "Sync now" under Currency rounding rules?
Only if your store uses Shopify Payments multi-currency and you've changed your rounding rules in Shopify. Stores selling in a single currency can ignore this option.
Do I need an API key to connect Claude or ChatGPT?
No. You copy the connection address from Preferences and add it in your assistant as a custom connector. The assistant then asks for permission, and you approve it here in Vitals. There's no key to generate, store, or rotate.
Can an AI assistant change something in my store?
No. Every connection is read-only. An assistant can read the areas you approved and report back — it can't publish a review, edit an offer, change a setting, or place an order.
How do I disconnect an assistant?
Open Preferences, find the assistant in the AI assistants list, and click Disconnect. Its access stops right away, and you can reconnect from the same place whenever you want.
I don't see the "AI assistants" section in Preferences.
The section is part of the Vitals bundle, so it doesn't appear if you use a standalone Vitals app on its own. It's also hidden when your store can't use it. If Vitals has been uninstalled, or your Shopify store is suspended or blocked. If your store is active and on the Vitals bundle and the section is still missing, reload the page, then contact support.
My assistant says there were too many requests. What does that mean?
Each store has a limit on how many requests its connected assistants can make per minute, so one busy conversation can't slow everything else down. Nothing is blocked and there's nothing to fix — wait a moment and ask again, or ask for less at once, such as a narrower date range or fewer records.
💡 Looking to change how a specific Vitals element looks? Custom CSS is the right tool for small visual tweaks — and if you're not comfortable writing CSS, our support team is happy to help you with the exact code.
❓ Custom code saved but nothing changes on your store? The Vitals app might not yet be enabled on your Shopify Theme via the App Embeds section. For more information, you may go here: Enabling the Vitals app via App Embed