
Creating a Spend Goal

Looking for a smart way to increase your Average Order Value (AOV) while keeping your brand perception strong? The Spending Goal Upsell Offer, available in the Upsell Builder app, introduces gamification to your Shopify store—without devaluing your products.
This powerful tool turns shopping into a fun challenge, giving customers a reason to spend more and return often. Here's how it works and how to set it up.
🎯 What Is a Spending Goal Campaign?
A Spending Goal Campaign uses gamification to encourage customers to increase their cart value in exchange for discounts. It’s fully customizable and designed to:
- Increase average order value
- Improve customer engagement and loyalty
- Automate upselling without manual intervention
- Fit seamlessly into your brand style
You can offer up to 10 discount tiers, motivating customers to hit higher targets for better rewards.
💡 Why Use Gamification for E-Commerce?
When implemented well, gamification taps into emotions like curiosity, excitement, and satisfaction, which are proven to:
- Drive purchase behavior
- Improve retention
- Strengthen brand recall
Gamified experiences turn casual shoppers into committed buyers. And the best part? It’s automated, engaging, and completely aligned with your store’s tone and visuals.
📊 Know Your AOV Before You Begin
To create an effective Spending Goal campaign, first identify your store’s current AOV. Here’s how:
- Log in to your Shopify admin.
- Go to Analytics > Dashboards.
- Find your Average Order Value under the performance metrics.
👉 Pro Tip: Set your spending goal slightly higher than your current AOV to encourage larger orders without discouraging shoppers.
We also have a list of frequently asked questions about our Upsell Offers that you can check here: Upsell Builder FAQs
🧭 Step-by-Step Guide to Creating a Spending Goal Offer
Create a Spending Goal
- From your Shopify Admin, open the Vitals app and go to Upsell Builder.
-
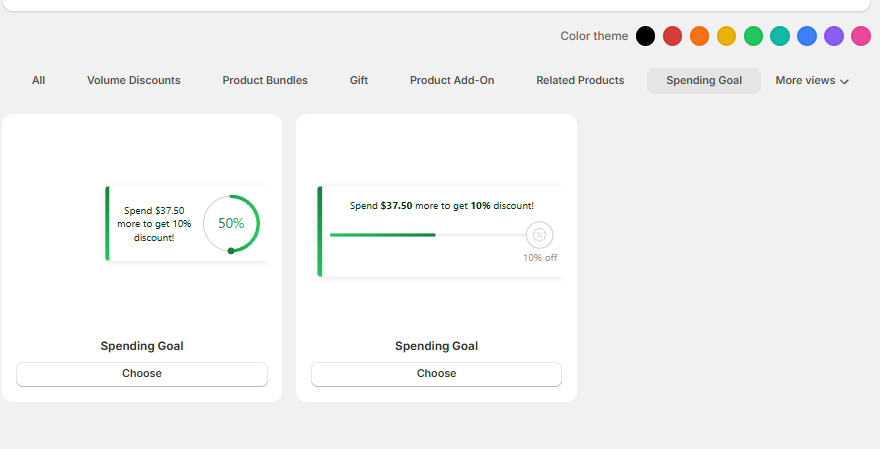
Click Create offer. On the Choose your offer type page, find Spending Goal, pick a layout — Circular or Linear — and click Choose.
-
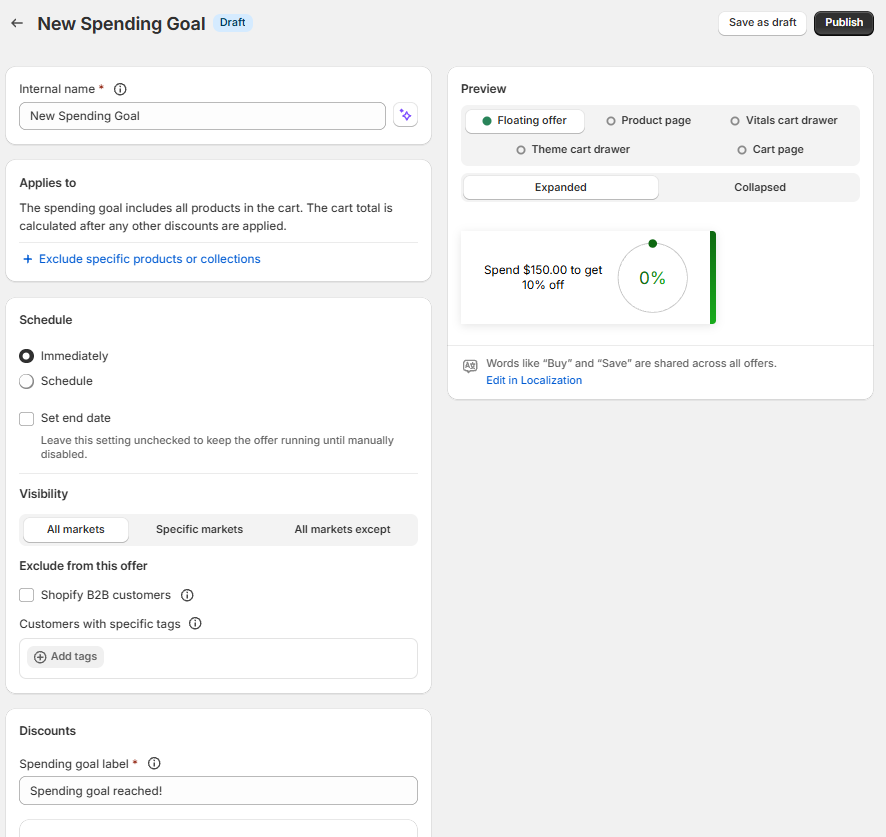
The Spending Goal editor opens as a single page, with the settings cards on the left and a live preview on the right. Work through the cards from top to bottom, as described below.
Internal name and Applies to
Give the offer an internal name at the top of the page. It helps you find the offer in your offer list and isn't shown to shoppers.
The Applies to card confirms that the Spending Goal includes all products in the cart, and that the cart total is calculated after any other discounts are applied.
- To leave some items out, click Exclude specific products or collections and choose them in Shopify's picker. Each exclusion list holds up to 90 items.
Schedule
Choose when the Spending Goal goes live:
- Immediately — the offer starts as soon as you publish it.
- Schedule — choose a Timezone, Start date and Start time.
Tick Set end date to end the offer automatically at a set date and time. Leave it unticked to keep the offer running until you turn it off.
Visibility
If your store sells in several Shopify Markets, choose All markets, Specific markets or All markets except to control where the Spending Goal runs.
Exclude from this offer
You can hide the Spending Goal from certain logged-in customers:
- Shopify B2B customers — customers buying for a company through Shopify B2B won't see the goal, so the rewards stay with your regular shoppers.
- Customers with specific tags — click Add tags and choose the customer tags to exclude. Customers with any of these tags won't see the offer.
Excluded customers don't get the goal's rewards at checkout either, including a free-shipping tier. Both options are off by default, and guests who aren't logged in are never excluded.
Discounts
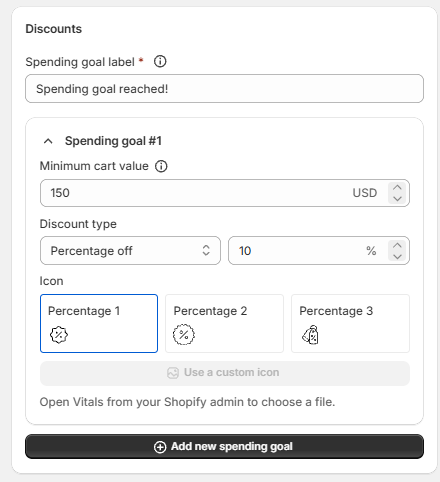
In the Discounts card, first enter the Spending goal label — the name of the discount shoppers see once they unlock a reward. Then set up your tiers: each one appears as Spending goal #1, Spending goal #2 and so on. Click Add new spending goal to add a tier, up to 10.
Each tier has these settings:
- Minimum cart value — the cart total a shopper needs to reach to unlock this tier.
- Discount type — Percentage off, Amount off or Free shipping, plus the discount value for a percentage or amount.
- Icon — the icon shown for this tier on the progress bar. Pick a preset, or click Use a custom icon to choose your own image.
Only one tier per Spending Goal can use Free shipping — once a tier uses it, the option is greyed out in the others. A free-shipping tier also offers Exclude shipping rates over a certain amount, so an expensive express rate isn't given away for free.
🎯 Example:
- Tier 1: Spend $50 – Get 10% off
- Tier 2: Spend $75 – Get 15% off
- Tier 3: Spend $100 – Get 20% off
Good to know: a Vitals free-shipping reward doesn't combine with other shipping discounts, and Upsell Builder discounts don't apply to subscription items.
Text formatting
The Text formatting card holds the messages on the progress bar. One set of messages covers every tier:
- At 0% — before the cart counts toward the goal.
- Between 1 - 99% — while the shopper is on the way.
- At 100% — once the goal is reached.
Defaults are provided, and you can rewrite them to match your tone. Use the Dynamic text variables to fill in details automatically: {{ reward }} is what the shopper unlocks (for example 10% off, $5.00 off or Free shipping), {{ goalAmount }} is the spending goal and {{ amountMore }} is how much more they need to spend.
To check your messages without a real cart, type an amount in Test Cart Value and watch the preview.
If an older Spending Goal still shows a separate Text for free shipping section, clear all three of its fields to use the messages above for every tier.
Placements
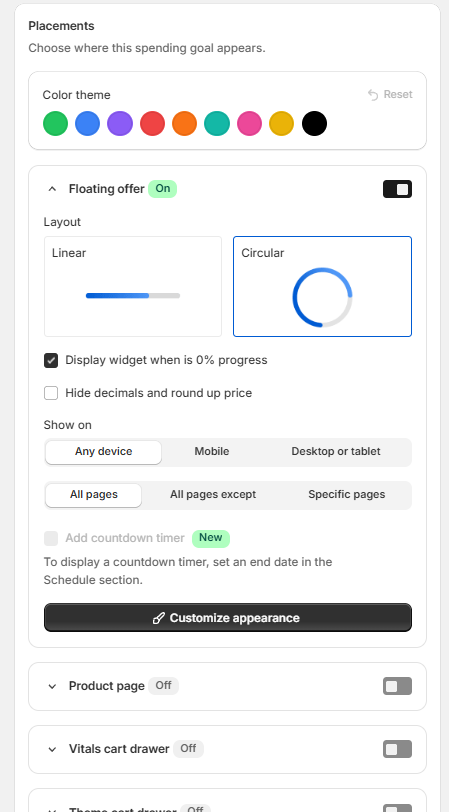
The Placements card decides where the Spending Goal appears. At the top, pick a Color theme — it applies wherever the goal shows.
The Floating offer row is the widget pinned to the edge of the screen. Make sure it's turned on, then expand it to set:
- Layout — Circular or Linear. Both work with any number of tiers.
- Display widget when is 0% progress — show the widget even before the cart counts toward the goal.
- Show on — Any device, Mobile or Desktop or tablet.
- Which pages it appears on — All pages, All pages except (then list the pages to skip) or Specific pages (then list only the pages it should show on). You can add a whole page type, such as all product pages or all collection pages, or pick an exact product or collection. The widget shows on your home page, collection pages, product pages and cart page.
Countdown timer
Still in the Floating offer row, tick Add countdown timer and enter a Title to show a countdown with the widget. The countdown runs until the offer's end date, so set one in the Schedule card first — until then the checkbox is unavailable and the row reads To display a countdown timer, set an end date in the Schedule section.
Customize appearance
Click Customize appearance at the bottom of the Floating offer row to open the full-screen appearance editor, with a larger live preview:
- Position — place the widget on the Left or Right of the screen and set its Distance from top.
- Appearance — sizes, the widget Icon, Color theme, Layout, Gradient start and Gradient end colors and Text color. You can use Test Cart Value here too. When the countdown timer is on, its Alignment, Size, Background and Text settings appear in this card as well.
Close the editor when you're done, then save the offer to keep your appearance changes.
Save and publish
When everything looks right, click Publish at the bottom of the page to make the Spending Goal live, or Save as draft to finish it later.
Once the offer is saved, the More actions menu at the top of the page lets you Duplicate or Translate it, or open its Analytics.
✅ Your Spending Goal is now live!
Running more than one Spending Goal
You can create several Spending Goals — for example, one for your whole store and another shown only on a specific collection. Give each one its own page rule in the Floating offer row so they appear where you want.
Shoppers see one floating Spending Goal at a time. If more than one goal could show on the page a shopper is viewing, Vitals shows the one with the smallest first spending goal.
👉 Tip: To show a different goal on a particular page, set your other goals to All pages except and list that page.
🏁 Final Thoughts
The Spending Goal feature combines strategy and psychology to motivate larger purchases, with minimal setup required. By offering meaningful incentives and a visually engaging experience, you’re not just offering discounts—you’re creating a goal your customers want to reach.
Start building your Spending Goal offer today and increase your AOV the smart way. 🎉