[NEW] Getting Started with Order Tracker
Last updated on October 21, 2026
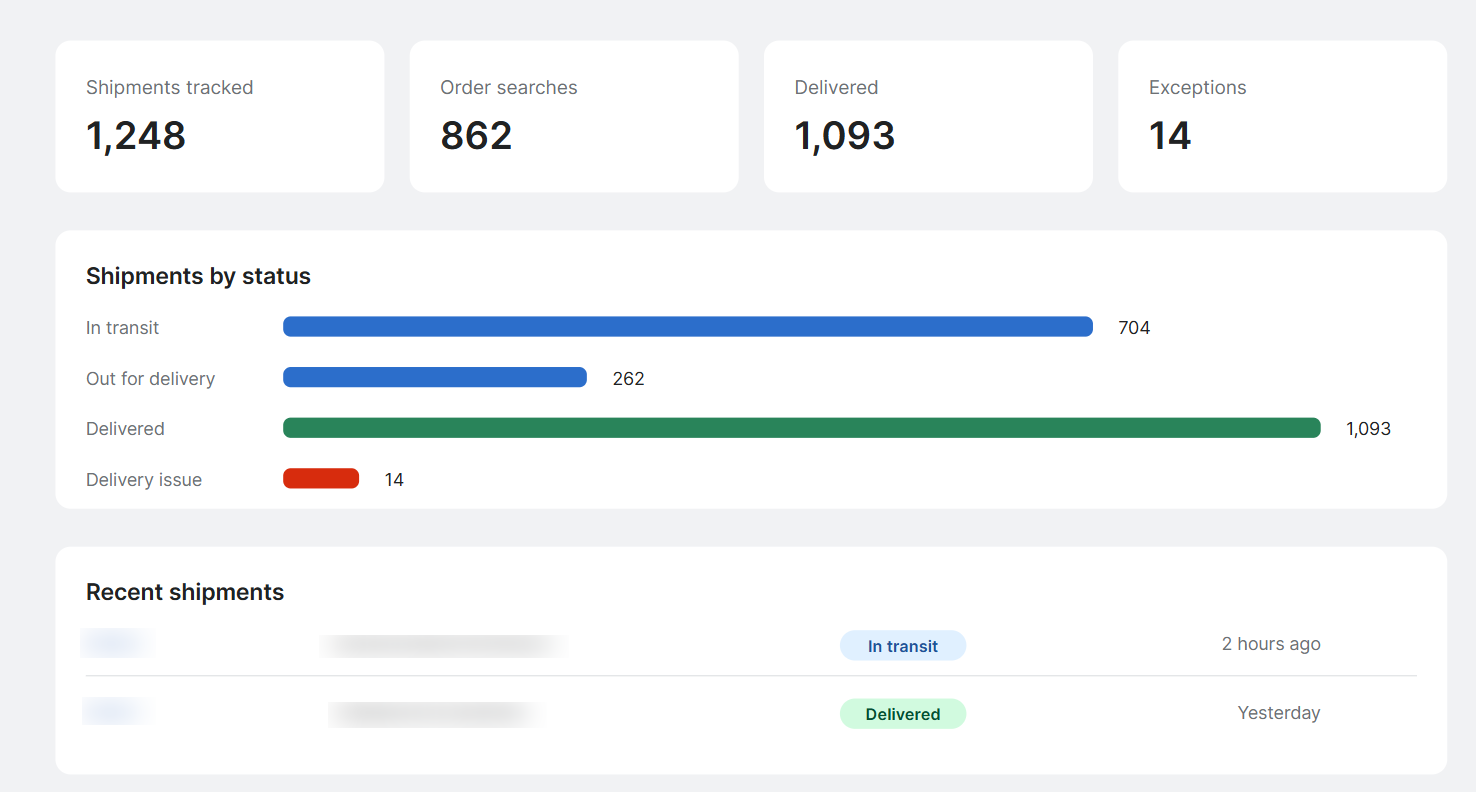
Give customers a branded order tracking page on your store and keep them informed from checkout to delivery.
Is this for me?
If your customers ever write in asking "Where is my order?", yes. Order Tracker adds a tracking page to your own store. Customers look up their order there and follow every carrier update through to delivery, without leaving your store for a carrier's website. You also get a dashboard of every shipment, so you can spot delayed or stuck parcels before a customer has to ask.
A typical case: a customer orders on Monday and gets your shipping confirmation on Tuesday. On Thursday she wonders where her parcel is. She opens your tracking page, enters her order number and email, and sees that it's out for delivery today, with the full tracking history underneath.
💡Good to know before you start: Order Tracker follows shipments from the moment you turn it on. Orders that shipped earlier aren't imported, but customers can still find them on the tracking page by entering the tracking number.
Every plan except Concierge includes 50 free tracked shipments per month. Concierge includes 2,000 tracked shipments per month. On the All-in-One plan, tracking continues past the included amount with a usage charge, up to a limit you choose. The article Managing Shipments and Your Monthly Tracking Limit explains the allowance and the limit.
Setup, step by step
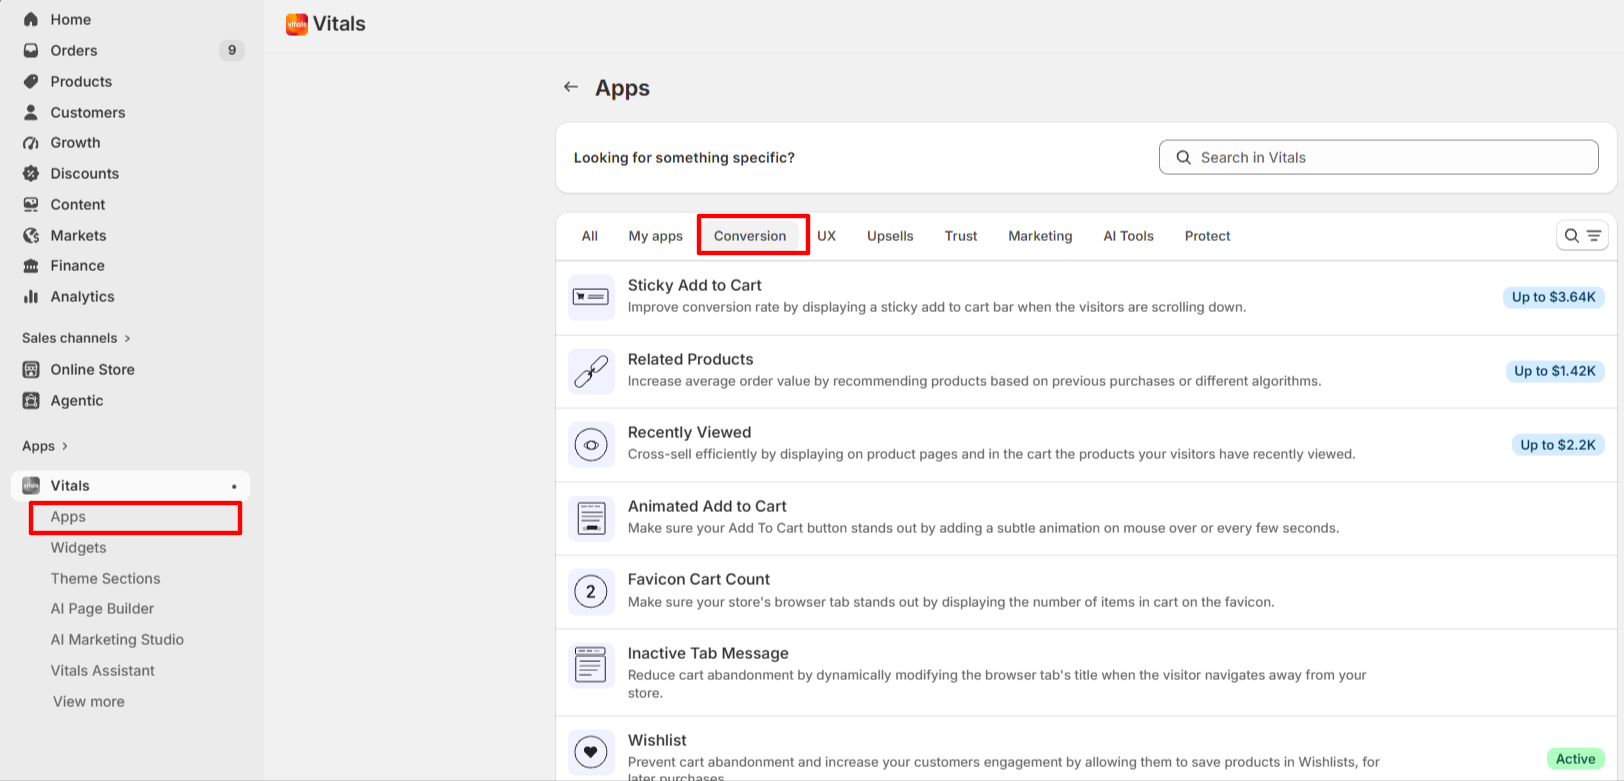
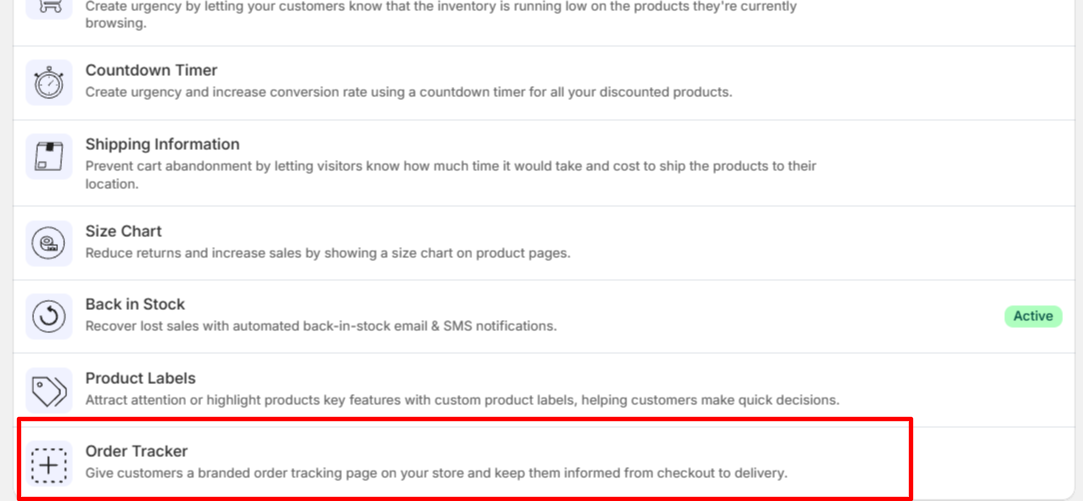
Open the Vitals dashboard and go to the Order Tracker app. It's under Apps > Conversion:
- Turn the app on with the activation toggle at the top of the app page.
Open the Settings tab. Under Tracking page, find the Your tracking page box and click Copy link.
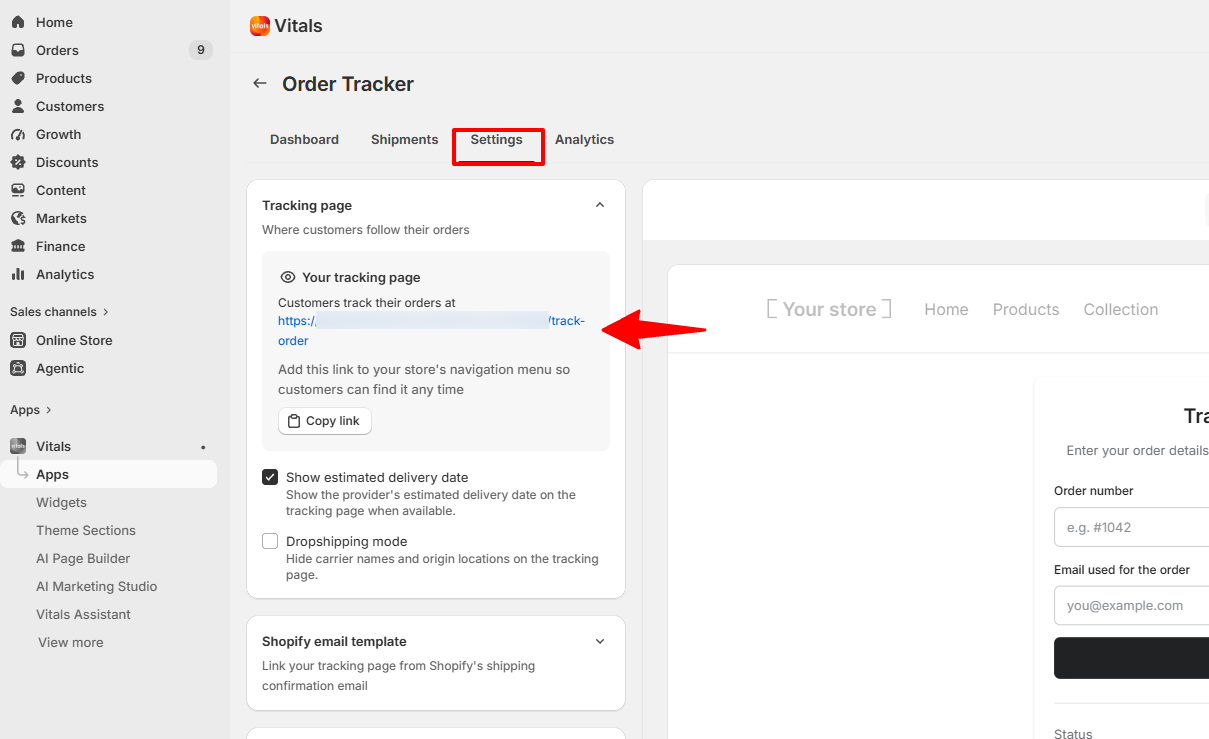
- Add that link to your store's navigation menu (for example your header or footer menu in Shopify) so customers can find it any time.
- (Optional) Choose whether to "Show estimated delivery date" and whether to turn on "Dropshipping mode". The preview next to your settings updates as you change them, and you can switch it between mobile and desktop.
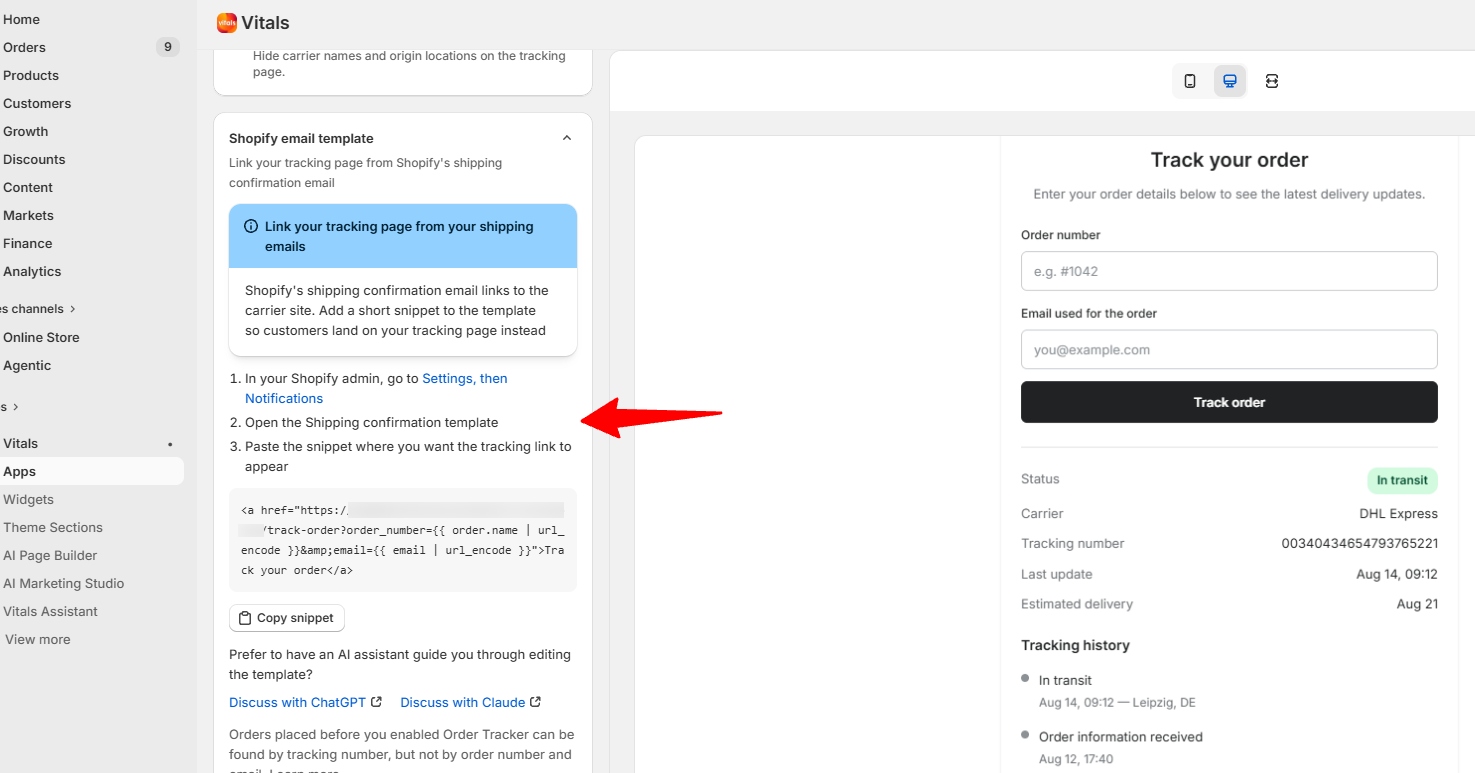
Open Shopify email template and follow the steps to add the tracking link to Shopify's shipping confirmation email (details below).
- (Optional) Open Translations to reword any text customers see on the tracking page.
- Save your changes, then open your tracking page link to check it on your storefront.
The tracking page your customers see
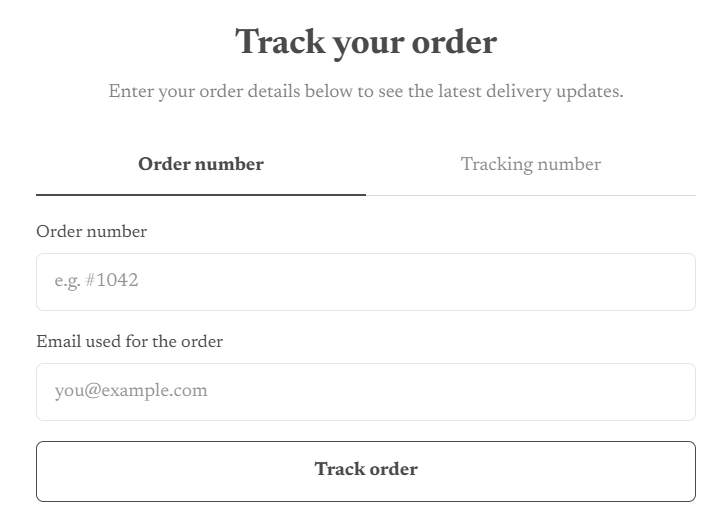
The page lives on your own store, inside your theme's header and footer:
https://your-store-domain.com/a/page/track-order
Customers can look up an order in two ways, using the tabs at the top of the form:
- Order number and email. The email must be the one used for the order. The order number can be typed with or without the # sign or your store's order prefix, so "#1042", "1042" and a prefixed version of it all work.
- Tracking number. Handy for orders placed before you turned Order Tracker on, or when the customer only has the carrier's details.
For each shipment in the order, the page shows the carrier, the tracking number (linked to the carrier's own tracking), the last update, the estimated delivery date when one is available, and the full tracking history. A Track another order button takes them back to the form.
If the order is confirmed but hasn't shipped yet, the page says so and asks the customer to check back once they receive their shipping confirmation email.
Your settings
Tracking page
- "Show estimated delivery date" — shows the carrier's estimated delivery date on the tracking page when one is available. On by default. Even with this on, the date is left out when the carrier's estimate isn't reliable enough, so customers aren't shown a date that's likely to be wrong.
- "Dropshipping mode" — hides carrier names and origin locations on the tracking page. Off by default. With it on, customers still see each status update and when it happened, but not the carrier name, the link to the carrier's website, or the wording and location of each scan. This is useful when your parcels ship from a supplier abroad.
Shopify email template
Shopify's shipping confirmation email links to the carrier's website. This section gives you a short snippet to paste into that email so customers land on your tracking page instead, with their order number and email already filled in. See Linking the tracking page from your shipping emails below.
Tracking page URL
This is the app proxy path that powers your tracking page. The default is /a/page, which is why the page lives at /a/page/track-order . Only change it if you've already changed the app proxy URL for Vitals in your Shopify settings. The two must match, or the page won't load. Use Reset to default to go back.
Shipments tracked limit
On the All-in-One plan, this setting caps how many shipments are tracked, and billed, each month. Choose 50, 250, 500, 1,000, 2,000, 3,000, 5,000, 10,000 or Unlimited. The default is 250. Your usage for the month is shown just below the setting. Once you reach your limit, new shipments aren't tracked until the count resets on the 1st or you raise the limit. You'll only see this setting on the All-in-One plan.
Translations
Most of the text on the tracking page can be edited here: the page title and description, the form labels and button, the status names, and the messages customers see when an order can't be found, when a lookup is taking a while, or when a tracking link has expired. If copy is missing for a customer's language, the tracking page shows the English default rather than blank text. Your own text and Vitals' provided translations take precedence. Two entries in the list, Status label and Estimated delivery unavailable, are left over from parts of the page that are no longer shown, so changing them won't change your live tracking page.
Linking the tracking page from your shipping emails
Shopify writes the shipping confirmation email the moment you fulfill an order, so the only way to put your tracking page in that first email is to add the link to the email template yourself. It takes a couple of minutes:
- In the Order Tracker app, open Settings → Shopify email template and click Copy snippet.
- In your Shopify admin, go to Settings, then Notifications.
- Open the Shipping confirmation template.
- Paste the snippet where you want the tracking link to appear, and save.
The link reads "Track your order" and opens your tracking page with the order number and email already filled in. Keep the copied snippet unchanged, especially the email part, so both fields can be filled in. If a customer checked out with only a phone number, they can use the Tracking number tab instead. If you'd rather have help editing the template, the section also has Discuss with ChatGPT and Discuss with Claude links that open an AI assistant with your snippet ready.
Shopify's own tracking links are not replaced automatically. Add the copied snippet to your shipping confirmation template to give customers a link to your Order Tracker page.
Settings reference
| Setting | Where | Description |
|---|---|---|
| Show estimated delivery date | Settings → Tracking page | Shows the carrier's estimated delivery date on the tracking page when available. Default: on. |
| Dropshipping mode | Settings → Tracking page | Hides carrier names and origin locations on the tracking page. Default: off. |
| Copy snippet | Settings → Shopify email template | Copies the tracking page link to paste into Shopify's Shipping confirmation template. |
| URL path | Settings → Tracking page URL | The app proxy path your tracking page lives under. Default: /a/page. Must match your Shopify app proxy settings. |
| Shipments tracked limit | Settings → Shipments tracked limit | All-in-One plan only. Caps how many shipments are tracked and billed each month (50 to 10,000, or Unlimited). Default: 250. |
| Translations | Settings → Translations | Most of the text customers see on the tracking page. |
Frequently Asked Questions
Where is my tracking page?
At /a/page/track-order on your store's domain. The exact link is shown in Settings → Tracking page, in the Your tracking page box, with a Copy link button. Add it to your navigation menu so customers can find it.
A customer can't find an older order. Why?
Order Tracker starts following shipments from the day you turn it on, and older orders aren't imported. Customers can still find those orders by switching to the tracking number tab and entering the tracking number from their shipping confirmation. When an order number and email don't match, the page suggests exactly that.
The link in my shipping confirmation email still goes to the carrier's website. How do I change it?
Add the snippet from Settings → Shopify email template to your Shipping confirmation template in Shopify (Settings → Notifications). Shopify's own tracking links are not replaced automatically, so the snippet adds a link to your Order Tracker page.
Why don't I see an estimated delivery date for some shipments?
The date only appears when the carrier provides one and it's reliable enough. Some carriers never share an estimate. "Show estimated delivery date" also needs to be on in your settings.
What does dropshipping mode hide?
The carrier name, the link to the carrier's website, and the location and wording of each tracking update: anything that could reveal where a parcel ships from. Customers still see each status (for example "In transit" or "Out for delivery") and when it happened.
Can I change the wording on the tracking page?
Yes. Open Settings → Translations to edit almost any text customers see, including the status names and error messages.
A customer says their tracking link is "no longer active". Is something broken?
No. The tracking links in your shipping emails stop working once Vitals no longer keeps that shipment, which is about six months after the parcel was delivered. The customer then sees "This tracking link is no longer active. Look your order up below to see the latest status.", with the lookup form right underneath.
A customer's lookup said "This is taking longer than expected". What happened?
When a customer looks up a tracking number Vitals hasn't seen before, the page asks the carrier for the latest details, which can take a few seconds. If the carrier is slow to answer, the page shows "This is taking longer than expected. Please check back in a minute — we'll keep looking meanwhile." Vitals keeps looking in the background, so trying again a minute later usually shows the tracking details.
My tracking page shows an error or doesn't load. What should I check?
First, check that Order Tracker is turned on. Next, check Settings → Tracking page URL: if you changed the path there, it must match the app proxy URL for Vitals in your Shopify settings. Click Reset to default if you're not sure. If it still doesn't load, contact our support team.