[NEW] Giving the Legal Guarantee Notice Its Own Page
Last updated on September 26, 2026
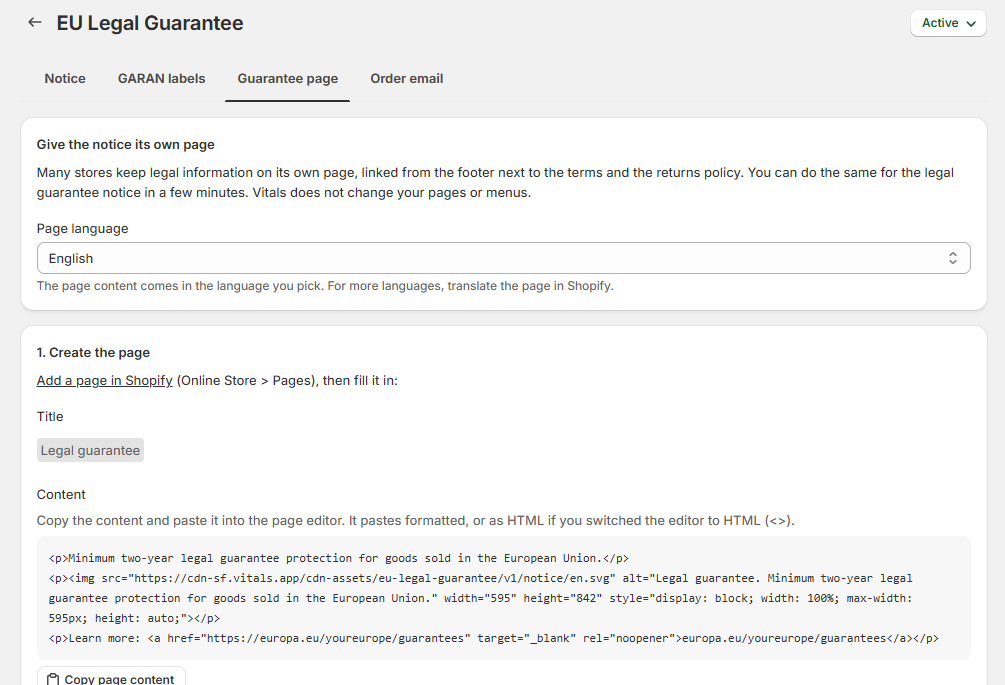
Many stores keep their legal information on pages of their own, linked from the footer next to the terms and the returns policy. The Guarantee page tab of the EU Legal Guarantee app lets you do the same for the legal guarantee notice: it hands you a page title, the page content with the official notice, and a footer menu label, ready to paste into Shopify. In the dashboard's words: "You can do the same for the legal guarantee notice in a few minutes. Vitals does not change your pages or menus."
This is optional. The notice on your product pages and in the cart works without it.
What you get
- Title — the notice's official title in the language you pick (in English, "Legal guarantee").
- Content — the notice's official headline as text, the official notice image, and the "Learn more" link to the EU's Your Europe page for that language.
- A footer menu label — the Commission's own suggested wording for the link (in English, "Your legal guarantee rights").
Everything comes in one language. As the tab says under "Page language": "The page content comes in the language you pick. For more languages, translate the page in Shopify."
How to create the page
- Open the Vitals dashboard, go to the EU Legal Guarantee app and select the Guarantee page tab.
- Under "Give the notice its own page", pick the "Page language". It starts on the language you already confirmed the page in, if you have; otherwise on the language you pinned on the Notice tab, or your store's main language.
- Under "1. Create the page", click "Add a page in Shopify" (Online Store > Pages). Copy the Title into the page title.
- Click "Copy page content" and paste it into the page editor. The dashboard's note: "It pastes formatted, or as HTML if you switched the editor to HTML (<>)."
- Keep the page visible and save it. As the tab reminds you: "The notice is official artwork, so leave the image unchanged."
- Under "2. Link it from your footer", click "Open your menus in Shopify" (Content > Menus) and open the menu your footer already shows, usually Footer menu. Click Add menu item, paste the suggested label, and pick the page you created under Pages.
- Back in the Vitals dashboard, under "3. Confirm it is live", tick "I created the page and linked it from my footer" and click Save. Vitals doesn't read your pages or menus, so this confirmation is how the app knows the page exists. Once ticked, the tab shows "Confirmed on [date]." and the requirements checklist on the Notice tab starts counting the page as a place the notice is shown. If you take the page down later, untick the box so the checklist stays accurate.
⚠️Add the link to the menu your theme already shows in the footer. In the dashboard's words: "Do not create a new menu: a new one shows nowhere until the theme uses it."
How the page shows up in the requirements checklist
After you confirm the page, the checklist's green row "The notice shows before purchase" lists it under "Shown in:" as "its own page, linked from your footer", alongside "product pages" and "cart" when those placements are on. If the notice isn't shown anywhere yet, the red row "Show the notice before purchase" (app off) or "The notice is not shown anywhere" (app on, both placements set to "Don't show") offers a "Give the notice its own page" link that takes you straight to this tab.
Frequently Asked Questions
Do I need this page for the notice to work?
No. The notice on product pages and in the cart, and the order email snippet, work without it. It does count, though: once you confirm the page under "3. Confirm it is live", the requirements checklist on the Notice tab lists it as a place the notice is shown, so a store that keeps the notice on its own footer page passes the "shows before purchase" check even with the product page and cart placements off.
Does Vitals create the page or the menu link for me?
No. Vitals hands over the content and opens the right places in your Shopify admin; you create the page and add the menu item yourself. The tab says so up front: "Vitals does not change your pages or menus."
Can I have the page in several languages?
The tab produces one language at a time. Pick the language you need, create the page, then translate it in Shopify's own translation tools for your other languages, or create one page per language and pick each language in turn.
Can I edit the content before publishing?
You can add text around it, but leave the notice image as it is - it is the European Commission's official artwork. The headline text and the Your Europe link that come with it match the image's language.
The page content pasted as code instead of a formatted page. What happened?
Your page editor was in HTML mode when you pasted. Switch it back to the normal editor (the <> button) and paste again, or keep HTML mode - the content works either way and shows the same page to shoppers.
I added the menu item but the link isn't in my footer.
Check that you added it to the menu your theme actually shows in the footer (usually "Footer menu"), not to a new menu. A newly created menu appears nowhere until the theme is set to use it.
I ticked the confirmation, but the checklist still says the notice isn't shown.
Click Save after ticking "I created the page and linked it from my footer" - the confirmation is stored with your other EU Legal Guarantee settings. Once saved, the row "The notice shows before purchase" turns green and lists "its own page, linked from your footer".