Adding Custom Payment Logos
Last updated on August 3, 2026
Alongside the built-in library of payment logos, the Payment Logos app lets you add your own custom logos — useful when you accept a regional payment method, a local bank transfer scheme, or any provider that isn't part of the standard set.
How to add a custom logo
- Open the Vitals dashboard and go to the Payment Logos app.
- In the Logos card, click Select logos. This opens the Add logos modal, which holds both the built-in logo grid and your custom logos.
Scroll to the Custom logos section of that modal.
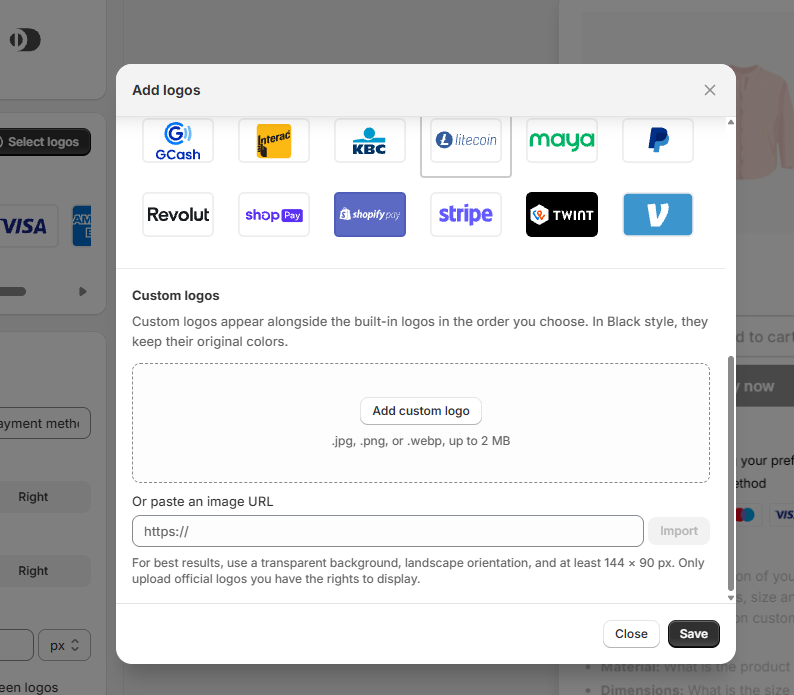
- Add your logo in one of two ways:
- Upload a file — use the "Add custom logo" upload area. Accepted formats are .jpg, .png, or .webp images up to 2 MB.
- Import from a URL — paste a direct link to the image in the "Or paste an image URL" field and click Import. The URL must link directly to a .jpg, .png, or .webp image up to 2 MB. Imported images are copied and re-hosted by Vitals, so your logo keeps working even if the original link changes.
- Click Save in the modal, then save the page. The custom logo now displays in your Payment Logos widget together with the built-in logos you've selected.
Uploads and deletions are only staged while the Add logos modal is open — closing it with Close discards them, so use Save if you want to keep your changes.
You can add up to 10 custom logos per store. To remove one, use the Delete option on the logo in the Custom logos section.
Reordering your logos
The logos you've selected appear as a drag-and-drop list in the Logos card. Drag any logo — built-in or custom — into the position you want, and the widget follows that order.
Where custom logos appear
- In the Payment Logos widget on your product pages.
- In the Cart Drawer footer, when the Cart Drawer's "Payment logos" section is enabled. The same artwork and styling are used in both places.
Tips
- For best results, use a transparent background, landscape orientation, and an image of at least 144 × 90 px.
- Only upload official logos you have the rights to display.
- With the Color style, custom logos are placed inside the same rounded white card as the built-in logos, so a transparent-background upload sits neatly in the row. With the Black style, your image is shown as-is.
- Stick to a handful of logos overall (built-in + custom) so the widget stays clean and scannable.
Frequently Asked Questions
Which file types can I upload?
.jpg, .png, and .webp images, up to 2 MB each. This applies both to file uploads and to images imported from a URL.
How many custom logos can I add?
Up to 10 custom logos per store, in addition to the logos you select from the built-in library.
Why did my image URL import fail?
The URL must point directly to the image file itself (ending in .jpg, .png, or .webp) — a link to a web page that merely contains the image won't work. Also check that the image is under 2 MB. Vitals fetches the image and re-hosts it on its own servers, so the link needs to be publicly reachable at the moment you import it.
Do custom logos change color with the Black style?
No. The Logo color setting — which appears when you choose the Black style — recolors the built-in logo artwork only. Custom logos always display exactly as you upload them, so if you use the Black style, consider uploading a version of your logo that matches it.
Can I reorder my logos?
Yes. The selected logos in the Logos card are a drag-and-drop list, and custom logos sit in that same list. Drag any logo into the order you want, then save.